Wednesday, August 29, 2012

And he sang, "God bless America!"

Family Update:

Big T is back on native soil, y'all, and he couldn't be happier.

After a 14 hour flight, Big T landed in DC this morning for the outprocessing, uh, process. He was starry-eyed for his homeland and so grateful for all the "small" things I take for granted every day; clean water, clean air and good food, to name a few.

This morning at his room in DC, he was happy to be able to take a shower with his mouth open, for example. Apparently, the water used for showers Over There is non-potable.
Let that sink in for a second.
Ew.
(Got the gross-out willies? I do.)

Big T volunteered for this gig, so he's not complaining. In fact, he's seriously contemplating another go round and very soon.

But, for the next little while, he gets to sing in the shower, loudly and with his head flung back and mouth wide open, "God bless America, land that I love!"

And, I'm glad I get to hear it.

Love you, Sweetie! We're so glad you're coming come!

Sunday, August 26, 2012

Tiny Corner Makeover


Mama, you've been here. You know what I"m talking about:

Oy with the switch plates, already.

And the telephone plates and cable nubbins, too. (I don't care if they're called co-ax thingies, Dear Brothers Jay & Johnny. They look like nubbins to me.)

Mulberry House is not lacking for connectivity; there are wall plates everywhere.

I wanted to pretty up a little, bitty corner of the counter bar area with a framed painting. But, right where I wanted to hang it, there was an obstacle:


I could deal with the double light switch and the quad-outlet but that dumb telephone plate was bugging the crap outta me. I looked into taking it off the wall but it was all funk-ily wired and I didn't feel like messin' with all that.

So, I covered it up.

I had some black and white checkered fabric and, just like the ribbon trim on the lamp, I wanted a tea stain. I cut a strip about 4 inches wide and  2 feet long and used the watered down craft paint to stain it. After it dried, I cut it in half and used part for a floppy bow and part for a tail. The tail part I used to cover up that dumb telephone plate.
You can barely see it in this picture, Ma, but I used my trusty hot glue gun to adhere a thin piece of wire to each long side of the tail:


I wanted to be able to scrunch it up and wrestle it into place to hide the plate.

Then, I attached the bow to the wall above the painting and I used the wire ends of the tail to attach it to the top screw of the dumb telephone plate.
I used a couple of strips of double-sided masking tape on the the face of the plate to make the tail stick.

And, abracadabra (or hocus-ka-pocus, like Nette says! Hi Nette!):


framed floral oil painting with checkered ribbon bow and tail


The Tiny Corner, just the tiniest bit made-over:


floral oil painting with checkered ribbon bow and peek-a-boo lamp with checkered trim


Smooches and Squeezes, Mama!
-Amanda

Linking, gratefully:

Friday, August 24, 2012

Lampshade Switchout, Peek-a-Boo!


What's shakin' Mama?

Since Big T. is going to be home in 4 days (and a wake-up), I don't want to dig out my drywall saw and make another big, fat mess. He hasn't had the chance to live one day in his new place and I'm going to try to let Mulberry house make a nice impression. Not the kind of impression that will require him to wear eye protection and a dust mask. You smell what I'm steppin' in?

So, I'm making a little, bitty mess. The crafting kind.

As part of this Tiny Corner makeover, I'm changing out a lampshade. The base is groovy enough (I like anything that even kinda looks like a polka dot. Or a stripe. You know how I be, Mums.) but the shade is somewhere between blah and bordello-riffic.

Inspired by Sheila's adorable lamp makover with the peek-a-boo shade over at Plum Doodles, I took off this shade:


Why don't ya come up and see me sometime?
 I bought a muted gold-ish lampshade and some checkered ribbon trim at Big Dubs (Wally-world, Ma. I'm talking about The Big Dubya) and a sweet birdie stencil from Hobby Lobby and I got stenciling:


The checkered ribbon was a straight up black and white and I wanted a tea-stained look. So, I diluted some metallic gold and tan colored craft paint with water to make a wash and I stained 'er up:


There were two styles of birdie stencils in the pack. I tweaked it a little and used both.
Here's the lamp with her new shade and trim, with the light off:


And, with the light on:

peek-a-boo lampshade
Magical!

Here's another angle, since there's a couple of birdies perched on this baby:


peek-a-boo lampshade with tea stained checkered trim

Now I'm sitting on my hands, Mutha Dawling, to keep from stirring up a mess around here.
Maybe you get out here and take me for a Fountain Soda? That'd be just great.

-Amanda

Tuesday, August 21, 2012

Diamond Tufted Ottoman; skirted, hinged and lined.


I'm more convinced than ever that my fabric choice for the tufted top is waaaaaay off. Egad.

Mumsy, you know how I just dive right into these things. Livin' and learnin', here in RookieTown.

Anyway, I didn't like how plain the bottom of the ottoman/blanket chest seemed, so I skirted 'er.
I didn't want to spend the money for the same linen blend I used on the tufted top (even though it's not Honest-to-Goodness linen, it was not cheap) so I went looking for some kind of lovely floral to make into a skirt. I went to 4 or 5 stores and I'll be danged if nothing looked right. I got sick of looking and I wanted to get this project wrapped up, so I bought tea-stained muslin at HobLob that was a decent match for the tufted top. I bought black grosgrain ribbon for trim.
The selvage edge of the muslin has a neat, fringe-y finish, so I pinned and sewed the grosgrain ribbon just above the edge to keep the fringe exposed.
When the skirt was pieced and stitched and gathered into a big circle, I checked for fit along the top edges of the box and I got staplin':


 To cover those staples, I used the grosgrain ribbon trim and my trusty hot glue gun:


diamond tufted ottoman with muslin and grosgrain ribbon trimmed skirt

Then, I added a "piano" hinge to secure the tufted top:

diamond tufted ottoman blanket chest with muslin and grosgrain ribbon trimmed skirt

Finally, I covered the inside lid with a layer of batting and muslin to hide the button switch-backs from the tufting process:


I stapled it down:


Then, I finished the stapled edge with grosgrain ribbon (and my trusty hot glue gun):


There still needs to be some kind of lid support system installed but it was late and I was in no mood for exact measurements. You'll be glad to know, Mama, that Big Ts gonna help me when he gets home in 7 days (and a wake-up).

I am stewin' and brewin' a new tufted ottoman for the living room, 'cause this baby ain't cuttin' it. She's wide enough and tall enough and her top is soft enough for the boys' keisters but I don't know if I love it skirted (and there's no going back now) and I think I might've mentioned a zillion times: I don't like the fabric I chose for the top.

Hey look, Ma, a news bulletin:
I've been elected Mayor of RookieTown!
Staple guns for everybody!
(or, Let them eat linen-blend!)

-Amanda

Tuesday, August 14, 2012

Diamond Tufted Ottoman, Take One.


Hi there Mumsy!
Just sitting over here, marinating in all my rookie-ness.

My ottoman with the lovely diamond tufting is mostly finished. Who'da thought the easiest part would be the tufting? Not this rookie.

I followed Kristi's fantastic, totally boss, diamond-tufted upholstered headboard tutorial over at Addicted 2 Decorating to make the tufted top of the ottoman.

The box? Well, I winged that.

I wanted an ottoman that was 18 inches high and I didn't want the height to be all legs. The thing has to be sturdy enough for teenaged butts to be parked on it. So, long, wobbly legs just wouldn't do.

I made the base a 24"W by 48"L by 12"H box and I'm planning to add 2" high bun feet down there just as soon as I can get Big T to look away from the bank account long enough to buy them.
(Wee bit o'sticker shock on those dang feet. I probably need to shop around some more because the bun feet I found at HD were about $10 a piece, not including the mounting hardware to screw them in.) 

The tufted top/lid adds another 4 inches of height, which includes the 1/2 mdf, 3 inches of foam and the double layer of batting, as Kristi recommends. Bringing the height to 18 inches (eventually).
Building the box:


Cool and groovy clamps.
Not sure what I was protecting the tabletop from with the cardboard there. I actually like dinged up tables. Like you can't tell.

After I plowed through about 8 thousand Spax screws and a half a bottle of glue to build the box (Big T would say it's "over-engineered" or "riddled with redundancies", take your pick), I used spray adhesive to apply a layer of batting to the outside.


Now, part of the reason this is Take One in the Diamond Tufted Ottoman adventure is because the fabric I chose is all wrong. I was weak and shallow and picked a linen blend because it's all the rage. Well, ACTUAL linen is all the rage but you know I wasn't spending that amount of moolah to make something that will surely be farted upon. So, linen blend it was. Lovely linen blend, with that goofy, crinkly texture and a Just Right color. But, no, not Just Right. Right? Feet and butts all over a delicate oatmeal-colored linen blend?
Weak. And. Shallow.
I'm looking forward to learning from my mistakes by moving this ottoman to a bedroom and making another one in a much sturdier fabric, like a Sunbrella with a pattern.
Alls I'm saying is; stay tuned, Ma, there's gonna be a Take Two.

Alrighty then. On to the top/lid.
Following Kristi's tutorial, I used spray adhesive to stick the foam to the mdf. Then I created the button layout and removed the foam at the button locations using a hole-saw drill attachment (by hand, not with the drill) and my sharpest scissors.   


I put 2 layers of batting over the foam and the fabric on top.
Let the tufting begin!


Horizontal rows first:


diamond tufted ottoman

Then, the diagonals, to create those pretty diamonds:

diamond tufted ottoman tutorial

Making neat folds and stapling to the back:

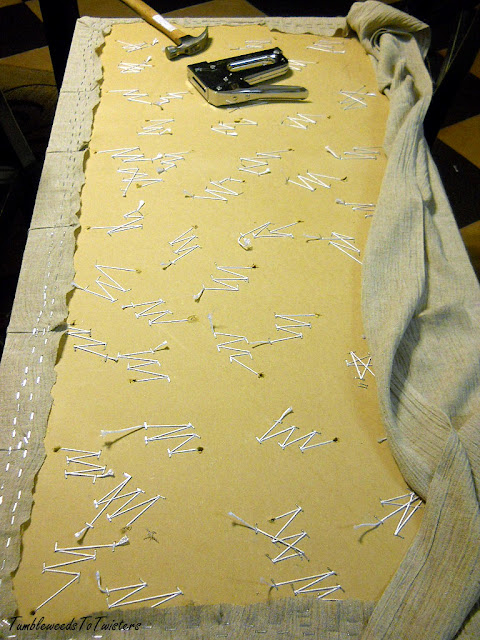
Check out those button switchbacks.


After I finished tufting the top and upholstering the box, I wasn't quite sure how I wanted to put the thing together. So I just set the top on the box and here she is, with no feet:

diamond tufted ottoman, linen blend fabric

Since this picture was taken I've added a skirt and hinged the top to make a blanket chest.
I'll get a picture of that up, lickety split.

But, I'm looking forward to building another one. This time I'm going to use a Kreg pocket hole jig or the new brad nailer my awesome brother just gave me (thanks Johnny!) to construct the base and a much sturdier fabric.
The tufted top really was the cinch-iest part of the whole thing because Kristi's tutorial (as well as the comments at the end of her tutorial) takes the guesswork out of it.

Now, c'mon over and put your feet up, Ma!
I'll get the Diet Cokes.

-Amanda

Linking, gratefully:

The Shabby Nest Furniture Feature Fridays 504 Main HookingupwithHoH
Too Much Time On My Hands